| Author |
Posted on 2016/08/12
#2058
|
| Baoulettes |
Hello :) After some moment of trial test I found way to do both minimap look good. So here we go. Difficulty : Easy - just long at first then it become faster. Requirement : GlobalMap and Localmap as png or other but same position and 1024x1024 BOTH not 256x256 ! Gimp GlobalMapProper.xcf : From HackStore. An hexa Editor (HxD for example in my screenshot I use it) KMP editor Ohana (not rebirth) OR a way to do "BCLIM" Patience ! Let first get a look what a GlobalMap and Localmap should look at First ! Both are in same position (I mean the road match for both) and both are 1024x1024 ! 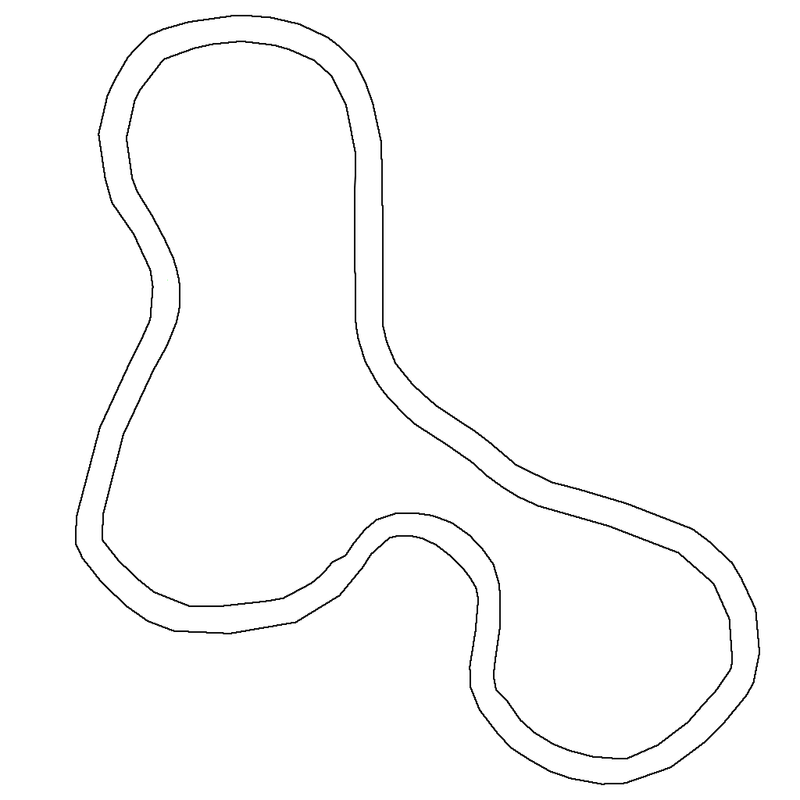 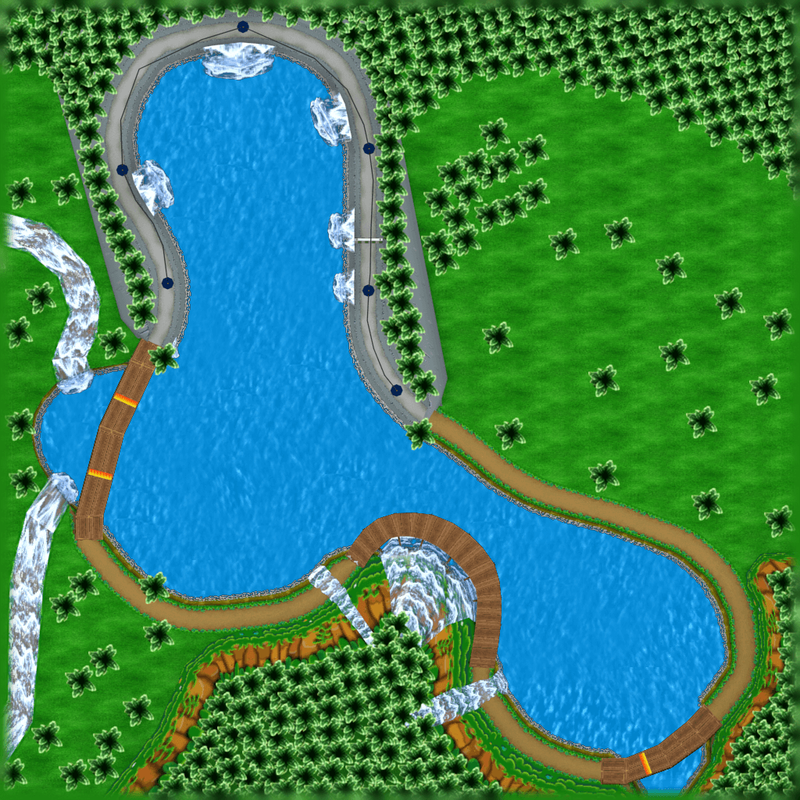 Now once you have them like I do, be sure, else you will have to start again from start. So Open Gimp and Load my .xcf. It should look like that : 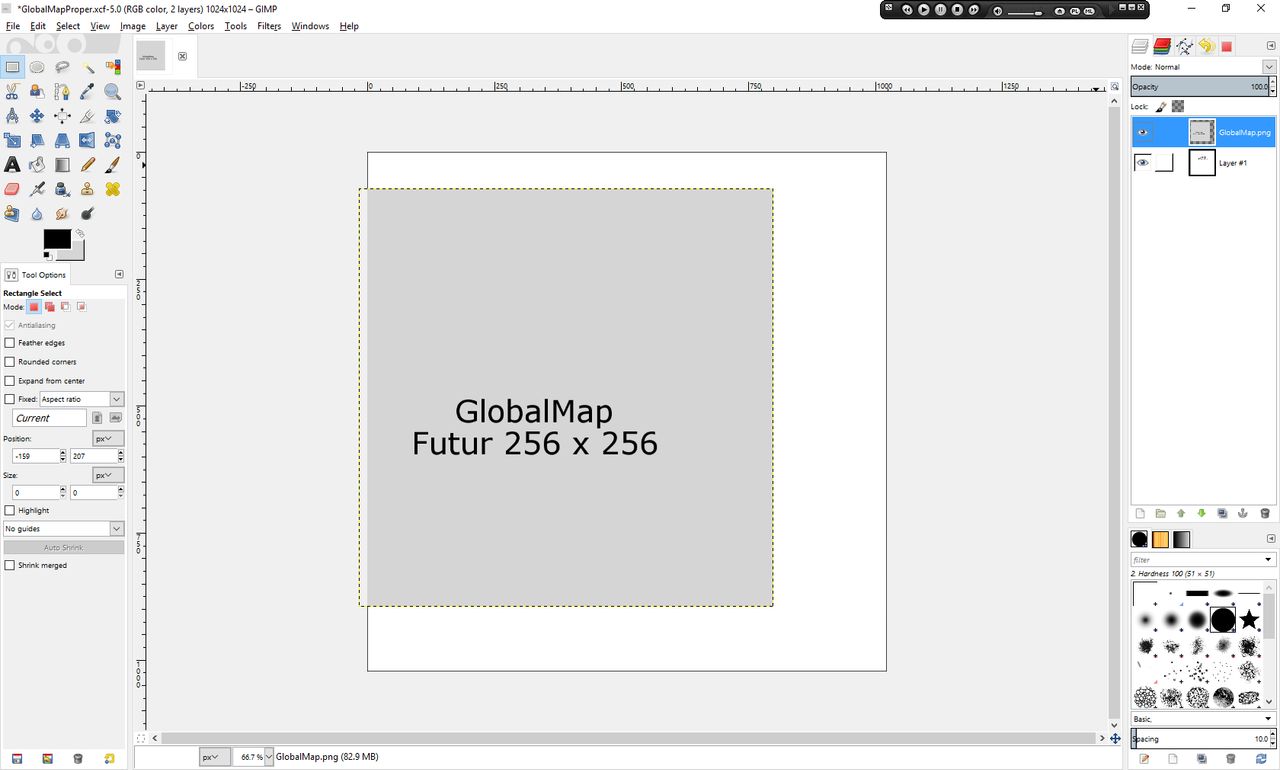 Now drag&Drop both GlobalMap and LocalMap pngs into that project. Be sure both are center and you should have something similar to this now : 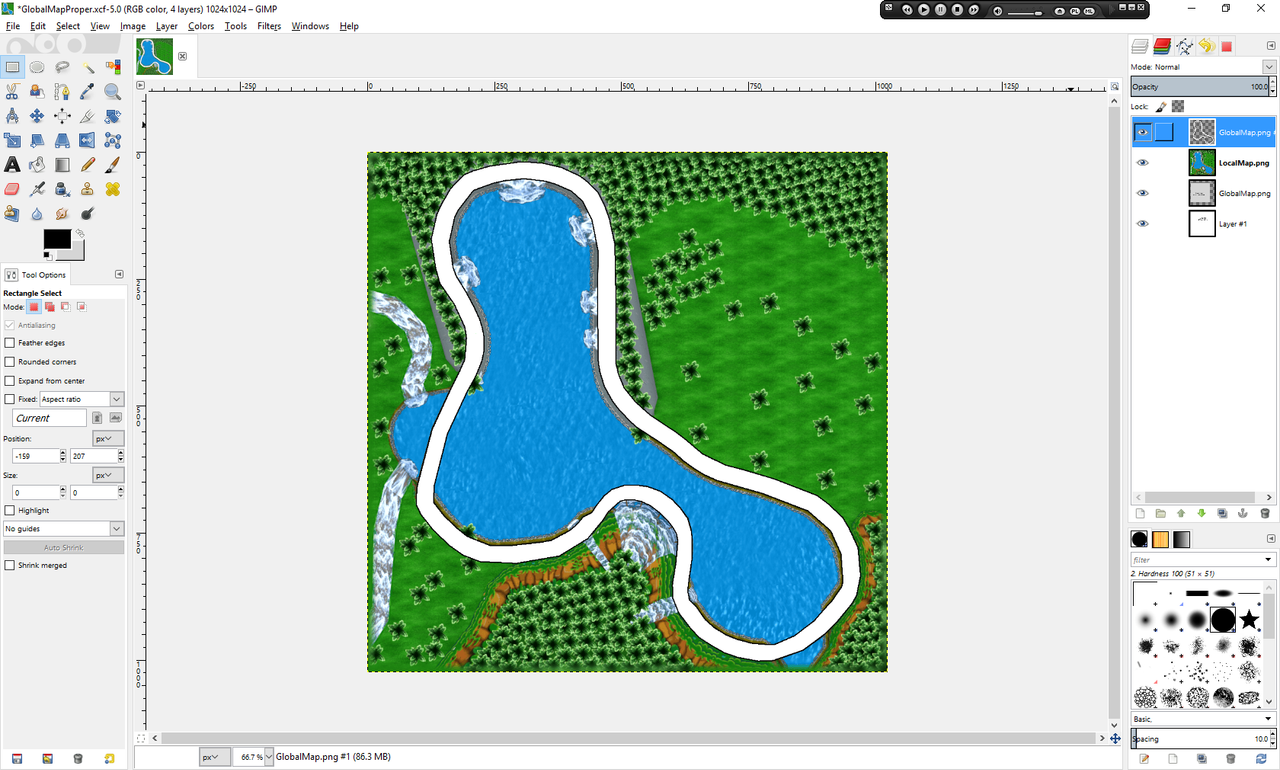 Once that done hide two layer, LocalMap & LocalMapBase. Select Your GlobalMap layer Scale it down with "Scale tool" (Shift + T) and put in the tiny dialog box like this : (Ps : to refresh scale and and remove on pixel with tiny arrows else it will not scale most of time.)  Click that "Scale Button" Now you will see things like that if you followed : 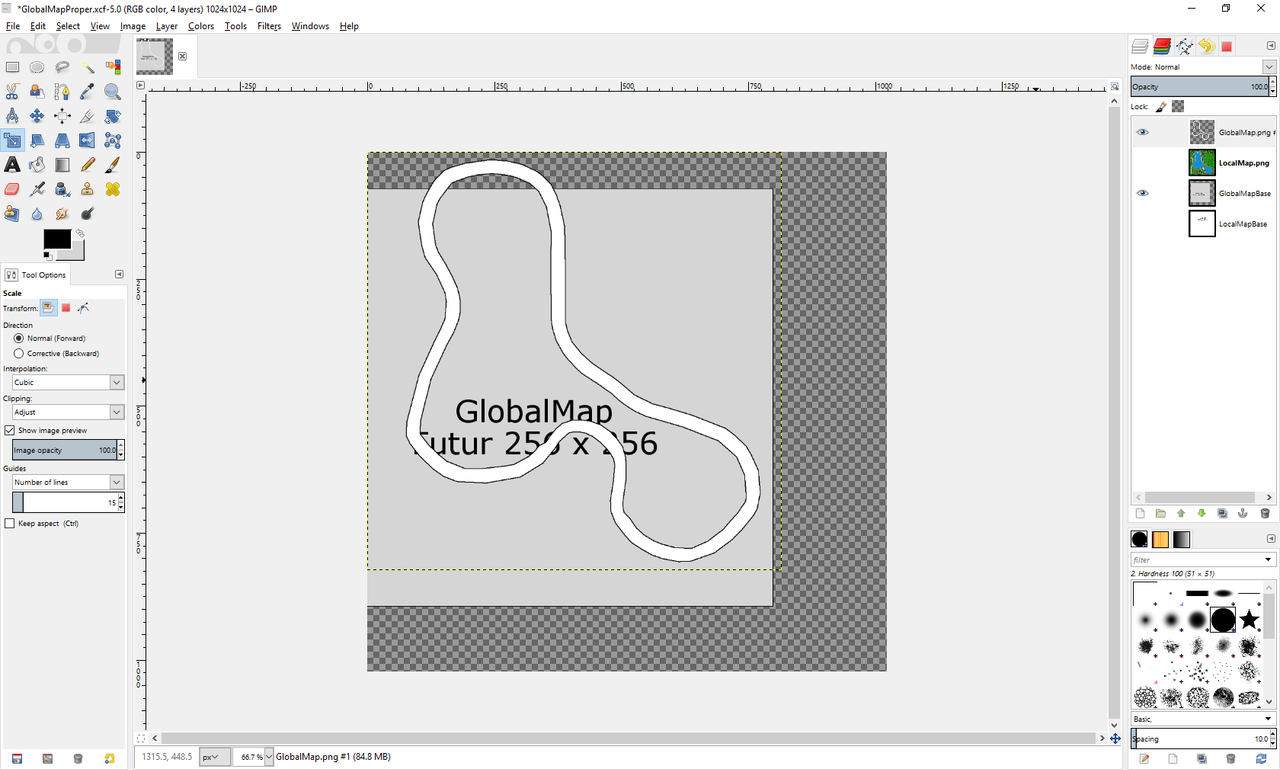 Using Black and yellow border of the layer place it carefully to match same position as "Base" Use CTRL + Mouse wheel to zoom (OSX should be Command + mouse slide if magic mouse else I don't know sorry) Zoom in to see the Right upper corner of GlobalMap Base. Use move tool (Key M) and Keyboard arrow to move Your globalmap to match the base. (careful a pixel count !) It should now look like that : 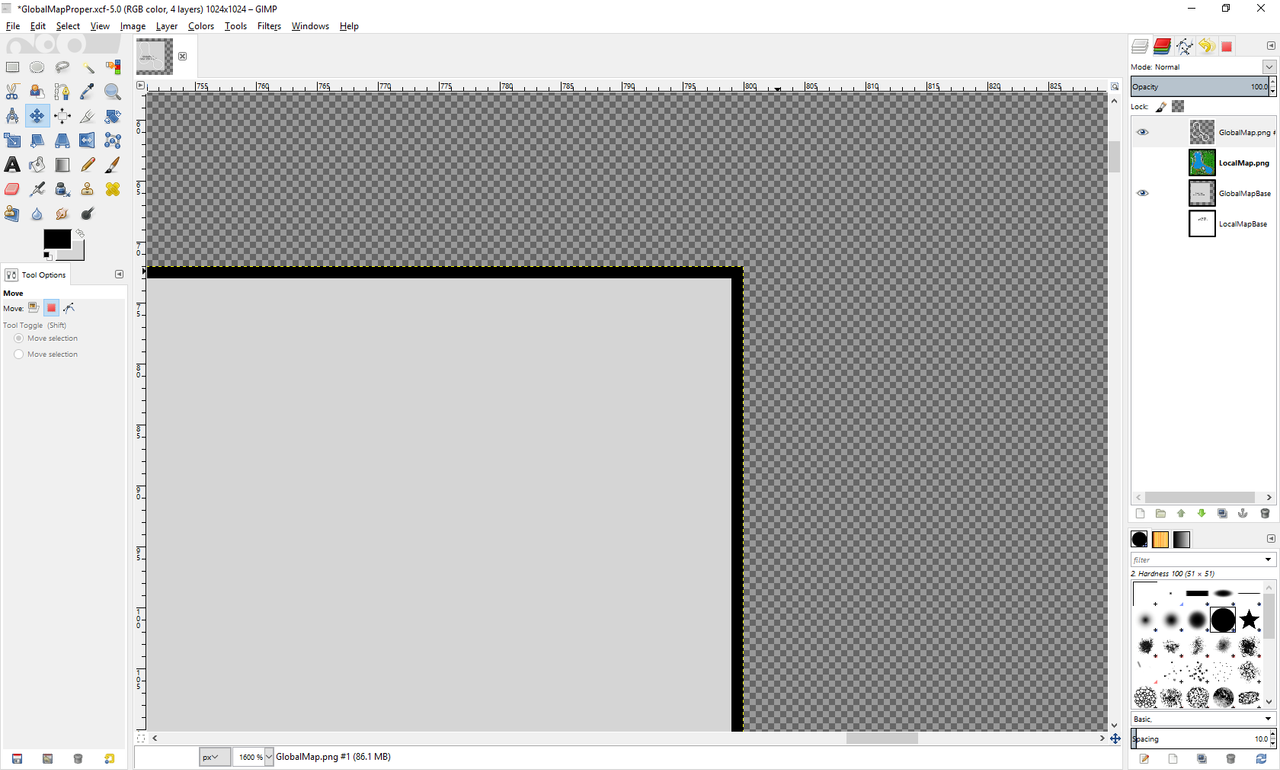 And if you zoom out to view all should look like that, Your GlobalMap should perfectly overlay the base and should be by few pixel out bound but that "normal" for now. till I found proper way.  Now, Hide the base and resize the image to be 256x256 to do that see this picture : 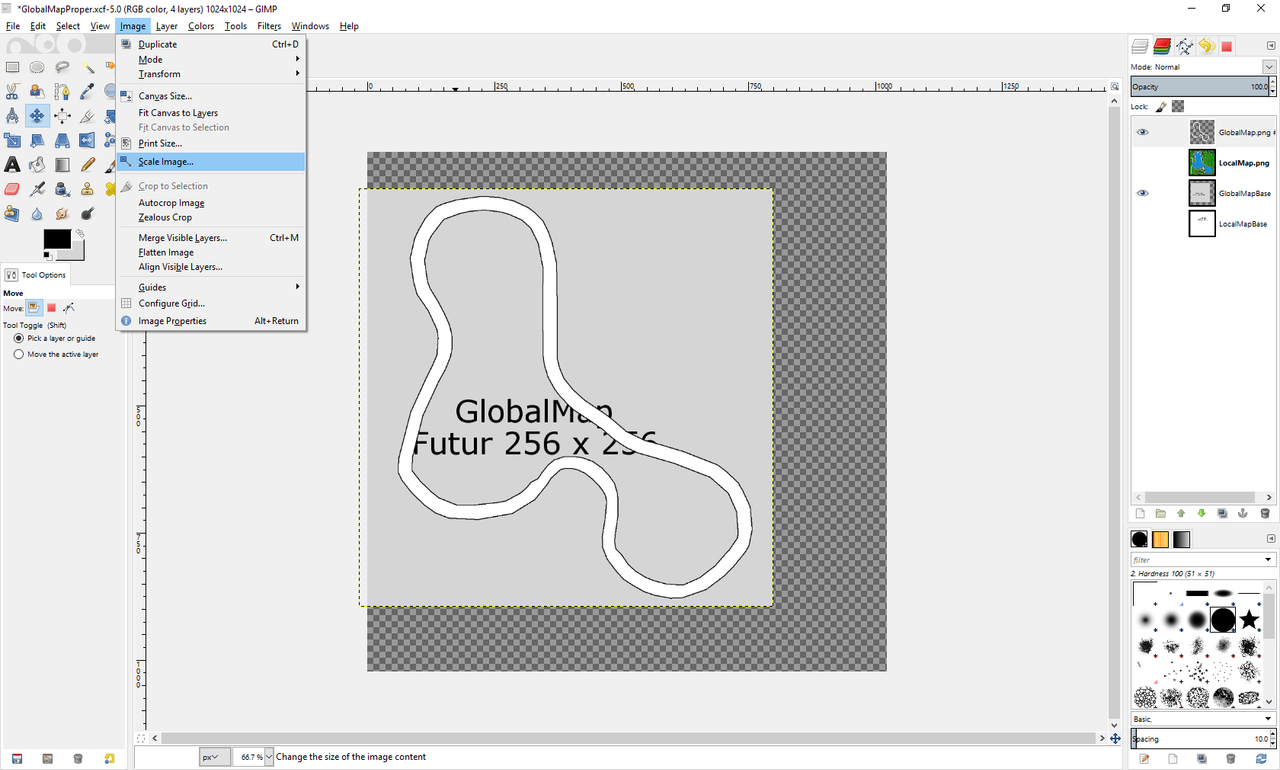 In the dialog box input 256x256 and zoom in to get proper view and you should have this, this way now : 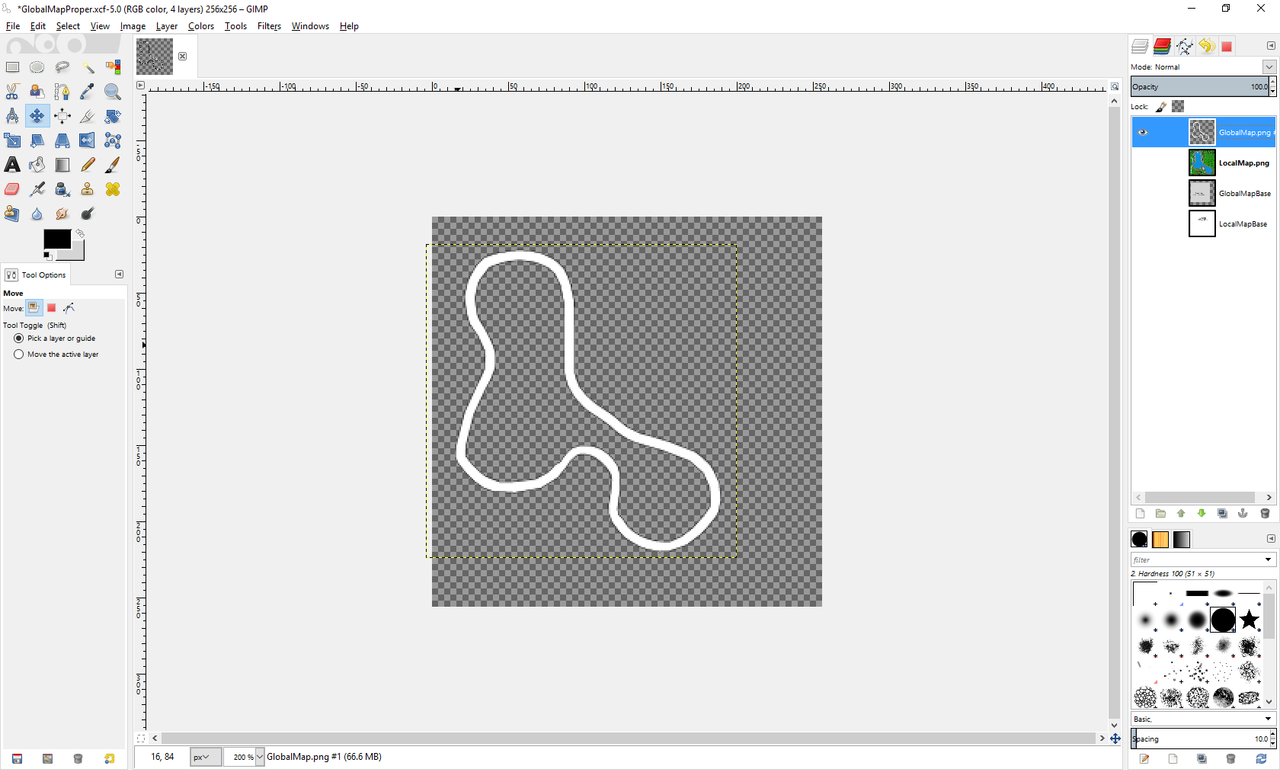 now you can do "Export as" and select as .png Name it "GlobalMapProper.png" as that how I will call it for the next part of the tutorial ! Now we will convert these PNG as BCLIM, if you know how good, for those who don't know use Ohana software open any original BCLIM with it. MapName_map.bclim = GlobalMapProper.png MapName_map2.bclim = LocalMap.png I think I didn't to explain that part as basicely everyone know and can easly learn this Ohana is pretty simple to use. For other method using nintendo software I will not explain it here :) Now we will do our .bin ! Well two to be honest to avoid a mistake made by KmpExp during save. So open KMP Expander with Both your KMP/UIMapPos.bin and Load you LocalMap.png as picture. You should have something like this matching your Custom Track : 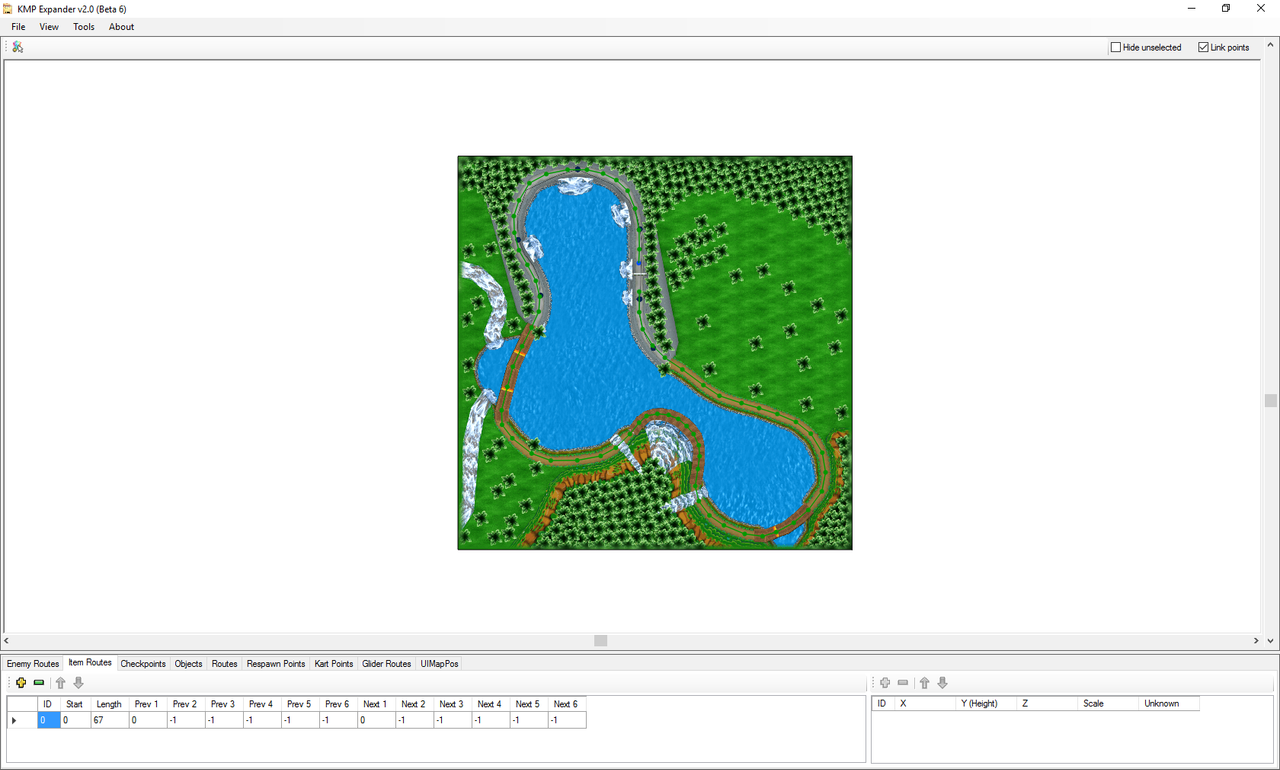 Now go in UiMapPos section and place your PNG to match your Ennemies Route or what ever you wish, place it properly to match your KCL or such till that look good, like you did before but it screwed that other tiny map. Be sure to use round number it will be Easier for you to get Global Map value. LocalMap = 1024x1024 png don't forget ! so for me it look like that : 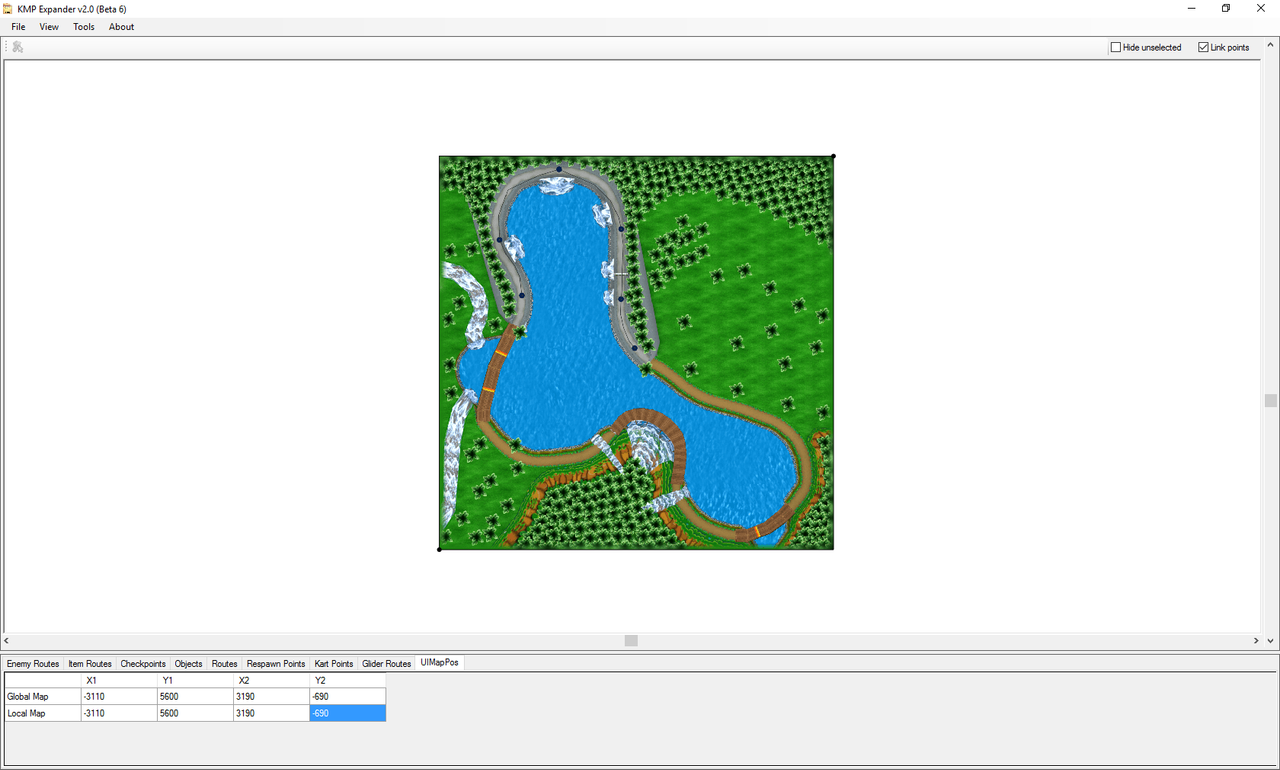 Now we will calculate Global map Points ! For that a tiny calculator or brain as you prefer :D GlobalMap X1 = LocalMap X1 - 150 GlobalMap Y1 = LocalMap Y1 + 701.269 GlobalMap X2 = LocalMap X2 - 150 GlobalMap Y2 = LocalMap Y2 + 701.269 Example on screen bellow check it :) so in short for me that : finish by selecting a GlobalMap value and press Enter this way it will now be a rectangle (That important for next) 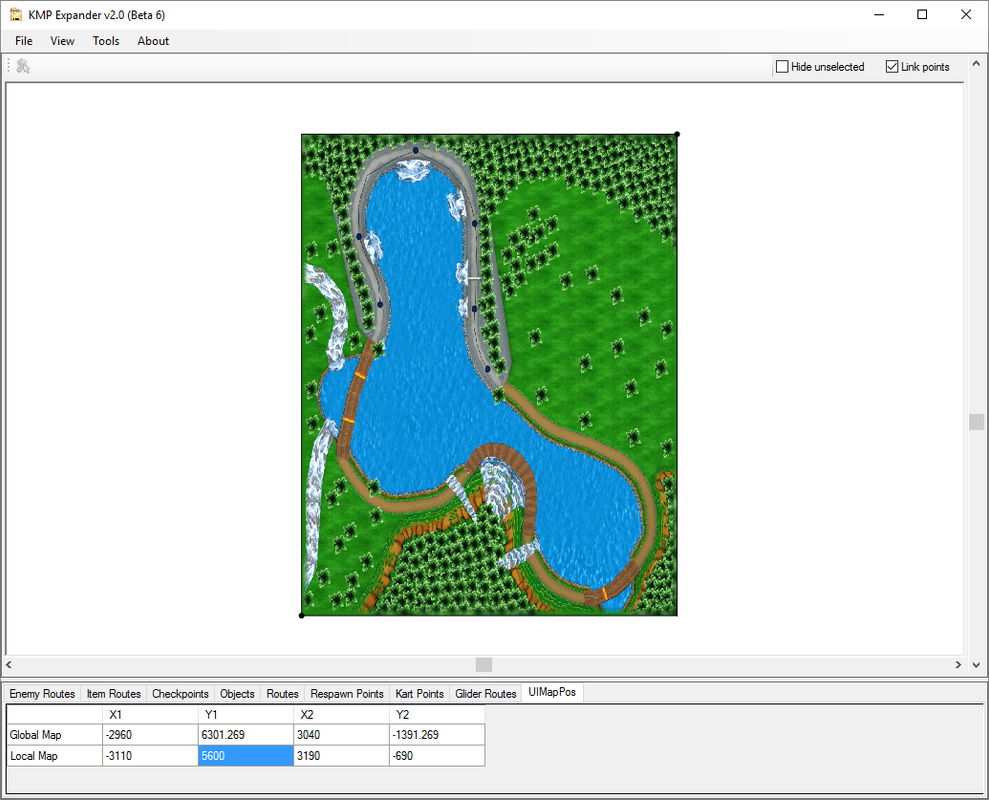 once that proper like that save UIMapPos.bin as UIMapPos1.bin ! and then Select a LocalMap point and press enter to get a good Square (enix) ! and this will be like that 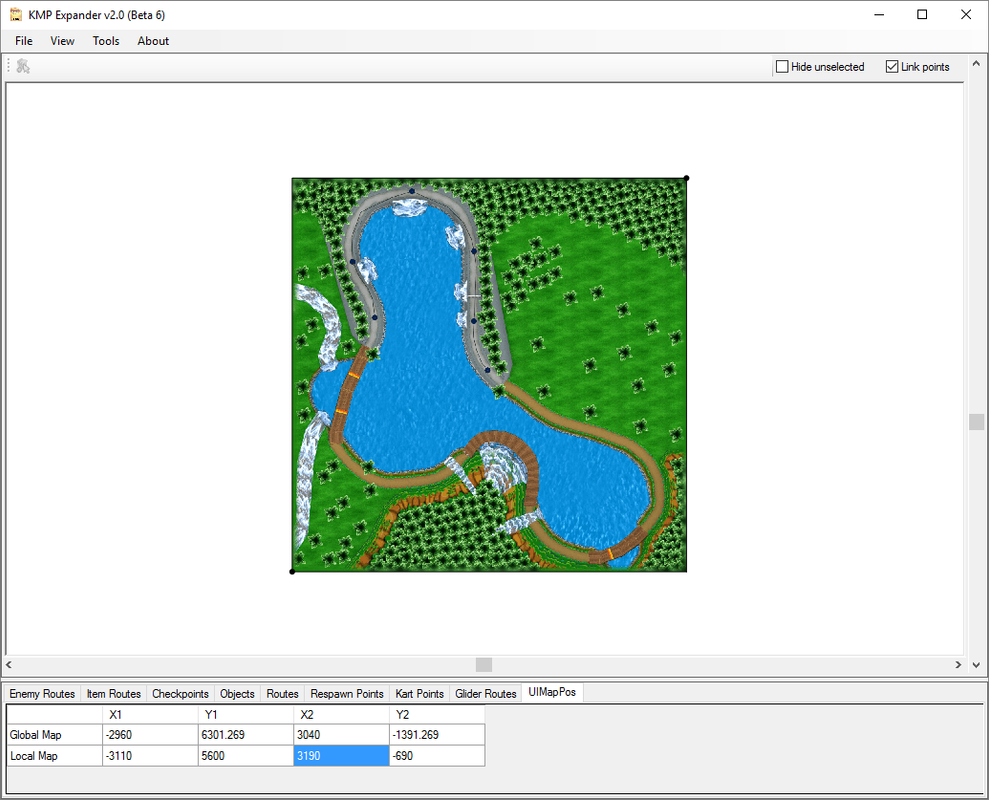 save the bin as UIMapPos.bin and open both on Hexa editor to get it that way (note the name of files.) You will see it this way : 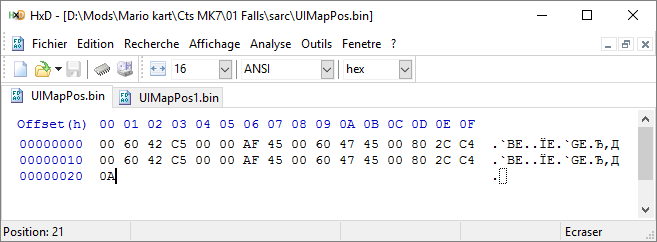 now that just a copy past job. Go on UIMapPos1.bin tab. And select + copy the first line : 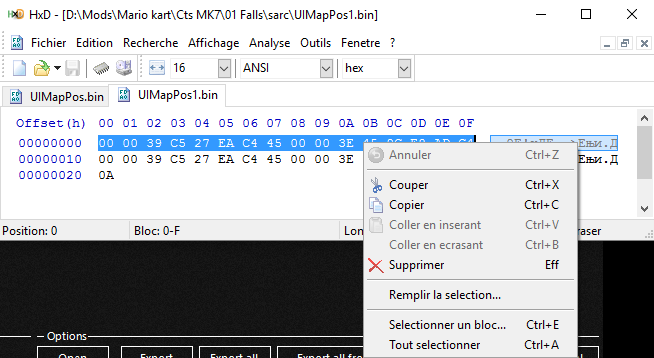 once copied go to the other tab (UIMapPos.bin) And paste this OVER the other first line. and this would make things like that : 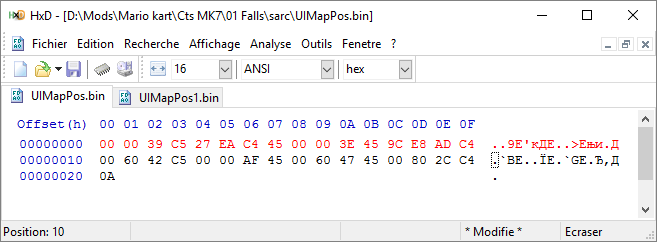 Now save that "UIMapPos.bin". Now, you should have proper UIMapPos.bin, BCLIM so just import it on the SZS by any method you would with other files :) The HackStore UIMapPos Edit.zip contain the following. All picture show in this tutorial in case they are deleted by host Gimp project template. Galvarny Falls GlobalMap.png and LocalMap in case you need reference :) You are free to rewrite, rehost picture as you wish in case that is required. Also I can help in case you need. |
| Author |
Posted on 2016/08/12
#2059
|
| MKGirlism |
Nice tutorial, but wouldn't it be easier to use InkScape instead of GIMP? I mean, Vector Art is scaleable, so if the map is to small or to big in-game, you can still resize it, without any quality loss. |
| Author |
Posted on 2016/08/12
#2062
|
| Baoulettes |
the game require 256x256 for white colour map and 1024x1024 for coloured maps, so about how you scale down/up you picture or where it is taken from it should be ajustable to any picture software editing ^^ I used gimp because that a fast/free and know method. Else I would have used photoshop but that isn't free so I wanted it to make it for all :) Yet if I have to correct anything feel free I would be glad to make it easier/faster. |
| Author |
Posted on 2016/08/12
#2063
|
| SGC Yellow | Inkscape is free, as well, actually. It's quite easy to use. I tried using GIMP to resize some things I'm working on without quality loss, but it didn't work. With Inkscape, you can start an something like Pixel art at any size you want, and you can resize it in Inkscape, and it'll look the same as it did before you resized it without any pesky side effects, such as blurry pixels. |
| Author |
Posted on 2016/08/12
#2064
|
| Baoulettes | You just have drop menu with cubic, linear and none when you scale up and down with gimp :) |
| Author |
Posted on 2016/08/12
#2065
|
| Miles Ermiiworth | I really see no problem at all, I use Photoshop, I don't care about quality loss anyway |